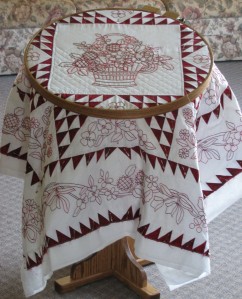
 I’ve started the quilting on my embroidered Red Radiance wallhanging. I normally quilt with the old-fashioned sticks and stands, but I purchased this hoop stand at the Lang Store during the pajama sale at Lolly’s Fabrics. I think it has been a good investment and is perfect for small projects. Best of all, I can sit in my glider chair while I quilt!
- Comment
- Reblog
-
Subscribe
Subscribed
Already have a WordPress.com account? Log in now.
I didn’t realize they carried quilt stands. I’m glad you like it. Beautiful quilt.
I couldn’t tell from the photo – do you quilt through the embroidery or around it – that is a large center so I wonder – I am working on a red work that will eventually be quilted as well and I had already been thinking about it – quilt through the embroidery or around?
I’m outlining the embroidery with quilting. I’ve seen projects before that they just stitched around the outside edge of the embroidery. I think that looks baggy and I don’t like baggy quilts. It takes more time to do it this way, but that is how I choose to do it and, for my project, that is the way I want it to be quilted.
Beautiful work. I love visiting the blogs that link to Esther’s WOW just to see the variety of projects. I am still fairly new to quilting as there was no history of it in my family. Your embroidery looks amazing.
This is gorgeous, I envy your patience, I just know this is going to look incredible.
Enjoy your stitching ….would love having a glider! 🙂 This is such a pretty project.
A beautiful redwork quilt.
That is a gorgeous hand quilting project… thanks for sharing it with us! Love the cross hatching you are doing!
Your quilt stand is great. I looks much sturdier than the one I currently use. I really love that redwork quilt. Beautiful.
Beautiful red and white quilt. Stitching in a comfy chair on a lovely quilt….perfect way to spend some time!
Hi Gretchen how beautiful your rework quilt looks hanging there, it reminds me of days gone by, it looks so warm and homely, and I’m thinking of a lovely fire burning keeping the house warm. Glenda
I love seeing this! I have my Red Radiance embroidered and pieced but haven’t started quilting it yet. I also want to cross hatch the background, but wasn’t sure about what to do with the embroidery. Your comments have helped me decide (I also would rather take the time and do it the way I want it to look). I’m finishing up my Sunbonnet Ladies now and my RR is next on the list. I’ll be checking out your progress – thanks for the inspiration!
My crosshatching is 3/4″. I had marked for an inch but then decided it was too big. It is taking a lot of time to stitch the outline of the embroidery, but I find when I try to hurry up a project, I end up wishing I had spent more time to make it the way I really wanted it to be. In the triangles, I’ve marked V’s 3/4″ apart. The corner squares are diagonal straight lines also 3/4″. The outside border is also marked with diagonal lines, of course 3/4″. Overall, I’m pleased with the way it is looking. I’ll be showing another picture later this week.
I made this pattern years ago for a retirement gift! I wish I had kept the pattern.
This is gorgeous and the hoop seems so convenient compared to setting up the whole quilt.