Archive | September 2015

Quilting Jane, Row L

The quilting on Row L has been completed.

IMG_0014

Left side triangle 2 and block L1. By the time I was piecing the triangles, I had gotten pretty good at paper piecing. The point of triangle LS 2 was supposed to have an applique diamond, but I paper pieced it. It looks much better pieced than my applique.

Instead of simply quilting another square inside of a square, I’m quilting this curved square design. I think it looks more interesting. I had a friend stop in last week to look at the quilt, she knew the name of this quilting design. I don’t remember what she called it! I should have immediately written it down.

IMG_0013


Blocks L2 and L3.


IMG_0012

Blocks L4, L5 and L6. Curves make a more interesting quilting design in L4 than just stitching in the ditch would be.

IMG_0011Blocks L7, L8 and L9. I should have reversed the colors in L7, too much white. Used Baptist Fan to make a more interesting quilting design instead of just stitching in the ditch.

IMG_0010

Blocks L10, L11 and L12. Here are 2 of the blocks I added circles to instead of the triangles Jane used. My applique skill isn’t good enough to applique those teeny, tiny triangles!

IMG_0009

Block L13 and right side triangle 12.

Yards of thread used to date – 192.

IMG_0022I’ve sewn half of the Cherry Blossom quilt together. Whoops, see that one B block turned the wrong way? At least it is hasn’t been sewn into a row yet. That is an easy fix.

Linking up with Esther’s WOW, Freshly Pieced and My Quilt Infatuation.

Charity Applique Blocks


I’ve enjoyed appliqueing these charity blocks.

IMG_0017This is Triangle 15, my favorite of the four. I didn’t really have a color scheme, I just appliqued fabrics that I thought looked nice. The background fabric is from my mother’s stash.


IMG_0019Triangle 4. The background fabric is a light blue fossil fern fabric. I also did Triangle 3 on the same fat quarter. Even though triangles 3 and 4 normally would be next to each other, since the guild is making a full size bed quilt, we are making additional blocks. My blocks 3 and 4 will not be next to each other in the finished quilt.

IMG_0018And Triangle 3. This is the disappointment block. I decided I was going to try some broderie perse. I don’t know if I did it the right way, I made it the shape of the flower that was supposed to have been EPP’d. I used mom’s older Asian fabrics and they just aren’t as bright and colorful as the newer Asian fabrics. Oh well, it’s finished.

I showed you triangle 16 in this post.

The 4 blocks are finished and I’ll return them to the charity committee during guild Monday evening.

I’m looking forward to starting my Sweet Surrender triangles, but before I start them, I have another applique project I want to make first, just for fun. I’ll show you how far I get with that project next week.

I’m pleased with the quilting progress on my Jane Stickle quilt. So far I’ve been able to quilt a row a week. I don’t know if I’ll be able to keep it up but I’m going to try. I would really like to have her finished to take along to the Jane Stickle retreat in April.

Last week I showed you the Stars and Sprigs quilt my guild made and donated to the Michiana Mennonite Relief Sale. The sale was held yesterday and she brought $2600. The photo used in the post was taken by Marie Troyer. Thanks Marie for sending me the photo and my apologies for not giving you the credit.

Linking up with Kathy’s Slow Stitching SundayLove Laugh Quilt, Quilting is More Fun than Housework, Quilt StoryA Quilting Reader’s Garden and Esther’s WOW.

Quilting Jane, Row M

The bottom row of the center part of the quilt has been quilted. I reversed the triangles for the left side border when I sewed them together. Triangle 1 is at the bottom of the quilt and triangle 13 is at the top. Remember, click on the picture to enlarge.

IMG_0002Left side triangle 1 and Blocks M1 and M2


IMG_0003Blocks M2, 3 and 4


IMG_0004Blocks M5, 6 and 7


IMG_0005Blocks M8, 9 and 10 – Most of the blocks in this quilt are made with very small pieces. Then Jane throws in a 9-patch block which doesn’t seem to fit in with the rest of the blocks. It just looks bigger than the other blocks even though it is the same size. I used a Baptist fan design instead of stitching in the ditch, more interesting quilting.

IMG_0006Blocks M11, 12 and 13 – I thought about quilting block M12 with the Baptist Fan but since M10 was so close, I decided to go with different design.

The narrow border between the triangle border and the center of the quilt is supposed to be 1/4″ wide. I didn’t like that size so I made my narrow border 1/2″ which is the same width as the sashing between the quilt blocks.

IMG_0007Right side triangle 13

153 yards of thread used so far.


IMG_0015

Half of the Block B’s for the Cherry Blossom quilt have been completed. I couldn’t wait to see what they looked like so I pinned 3 A’s and 3 B’s on the display wall. The yellow 9 patches don’t show very well, but I think this will be an interesting quilt anyway.

Linking with Esther’s WOWFreshly Pieced, A Quilting Reader’s Garden and Kathy’s Sunday Slow Stitching.

Stars and Sprigs

IMG_20150824_192055015Every year the Maple Leaf Quilt guild makes and donates a quilt to the Michiana Mennonite Relief Sale quilt auction. At the September guild meeting this year’s finished donation was displayed. Here she is, Stars and Sprigs, designed by Kim McLean.

This quilt pattern has both pieced and appliqued blocks, so the piecing people were happy and the appliquers were happy. This quilt was very much a group project. I appliqued four of the applique blocks and also helped with the some of the quilting.

I’m hoping there are 2 people at the auction who really want this quilt. Update 9-27-15 – She sold for $2600. The photo was taken by Marie Troyer.

Also at the guild meeting, the committee in charge of the 2017 donation quilt presented information about the new relief sale quilt. The pattern is Sweet Surrender designed by Sue Cody.

Several of us in the guild are also going to be piecing and appliquing this pattern to make our own quilt, so the guild blocks will be good preparation.

I finally got all the siggie blocks signed so now I can start on the guild blocks. I’m appliquing triangles 3, 4, 15 and 16. This is going to be a scrappy quilt and we are NOT to use white for a back ground.

IMG_0008Triangle 16 is completed. I tried to use brighter colors than I normally use. They worked well on this yellow batik. The little circles are dark red not black. The pink flower is EPP’d using 5/8th” papers. I thought it turned out cute, especially with the fussy cut butterfly center. These triangles are going to be a fun project.

I’m linking to Crazy Mom QuiltsKathy’s Quilts, Slow Sunday Stitching, Cooking up QuiltsLove, Laugh, Quilt and My Quilt Infatuation.

Quilting Jane, the Bottom Triangle Row

When the two side feather borders of Jane were quilted, up to the 6th row, I started on the bottom triangle row. I’m not doing anything special in the pieced triangle blocks, mainly stitching in the ditch and then outlining in the larger pieces. I’m using the same idea for quilting the white alternate triangles that Jane did in her quilt, inverted V’s. From what I can see, she had 3 V’s in her quilt so she must have marked for 3/4″ lines. I’ve marked mine at 1/2″ so I have 4 V’s.

Click on the photos to enlarge them.

IMG_5507


Here is my progress so far. Bottom left corner and 1st Bottom  Row triangle


IMG_5508


Bottom Row triangles – 2, 3 and 4


IMG_5509


Bottom Row triangles – 5, 6 and 7


IMG_5510


Bottom Row triangles – 8, 9 and 10


IMG_5511


Bottom Row triangles – 11, 12 and 13.


IMG_5512

Bottom Right Corner

Some of the triangles look so crooked, especially triangles 10 and 13. They really aren’t crooked, it must be the angle of the camera. Yards of thread used so far – 108.


IMG_0001I’ve been sewing the HST’s together for the Cherry Blossom quilt and I made 6 flannel receiving blankets for charity. I’m almost finished signing the siggie blocks then I have another hand project to start.

I’m linking up to Esther’s WOWKathy’s Quilts, Slow Stitching Sunday and Cooking up Quilts.


Quilting Jane – The Bottom Border

IMG_5499The entire bottom border of my Jane has been quilted. This is 92″ x 5 1/2″ of solid feathers. You can see I have a cover cloth on top of the quilt to keep her clean and protect from the sunshine. I only uncover the part of the quilt I am working on.

Since this picture has been taken, I have rolled to the bottom of the triangles but I’m not starting them yet. I like to quilt the side borders before starting on the center section. Most quilters don’t quilt this way, but I just got started doing this years ago and I’ve kept it up.

The whole quilt is not in the frame, the top portion is hanging over the other side. There is room to set up the whole quilt but it makes a tight squeeze when we walk into the living room.

I’ll quilt from the bottom up to and including the 6th row, then I’ll move the rest of the quilt into the frame.

IMG_5500This is the bottom right corner as I quilt my way on the right side of the quilt.

I didn’t realize the thread was in the photo until now. That is not a wad of thread, that is actually the thread I am using in quilting. I finished off a spool of thread so it is extra curly. Surprisingly, I can gently pull a thread out of the ball at a time and it doesn’t knot up.

I am keeping track of the yards of thread I use in this quilt. I got started doing this when I did custom hand quilting years ago. That is how I was paid, by the number of yards of thread in the quilt.

I am using white YLI thread for the quilting. I used to use Coats and Clark quilting thread, but their quilting thread is not the quality it used to be. I asked other hand quilters what they were using and YLI was the answer. I purchased it at Yoder Department Store in Shipshewana. I have quilted several quilts with this thread (including Red Radiance) and have been pleased with the results.

IMG_5501The siggie swap blocks have been sewn and now I need to get them signed. I’ll work at signing them a few at a time till I’ve got 67 of them autographed. They also need to be trimmed to size but I’m not going to do that, the recipients finish can them. Not everyone’s quarter-inch is the same. I’ve oversized them and they are 6″ now, need to be trimmed to 5 1/2″ so they can finish at 5″.

I’ll be linking up with Esther’s Wednesday WowA Quilting Reader’s Garden on Friday and Kathy’s Slow Stitching Sunday.

Prep Work

Since I’ve completed the embroidered quilt, I’ve  been focusing on prepping projects.

IMG_5477I need 67 attic window blocks for the siggie swap during the Jane Stickle Quilt retreat in November. They’re prepped and ready to be sewn. I’ve cut extra fabric to make more blocks. Not all of my friends are participating in the swap and I want their signatures too. There are enough prepped pieces for 80 blocks. I thought an 8 x 10 block layout would be the easiest setting.

I didn’t buy fabric for these blocks but used from my stash. The top dark blue was leftover from a project many, many years ago and the other blue is from the embroidered UFO quilt I just finished piecing last week.

I have no idea where the top medium  blue fabric came from. The middle one is another leftover from a project and the bottom fabric is from my mom’s stash. Muslin fabric is used for the signature section.

IMG_5479
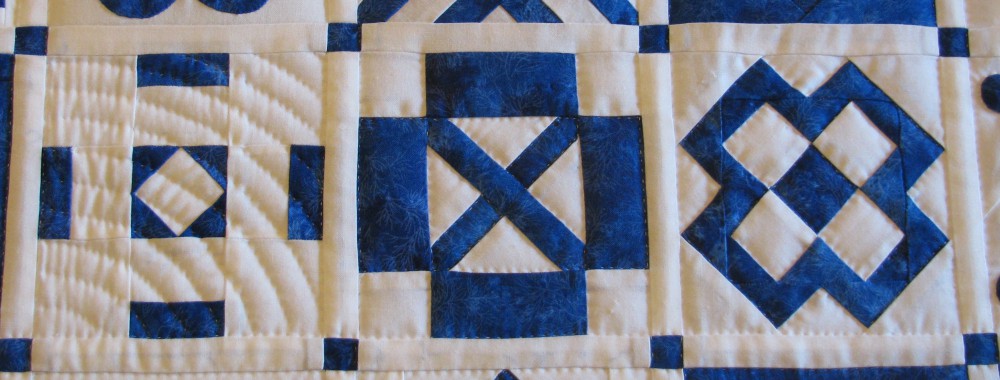
The sashings for the Salinda Rupp/Nearly Insane quilt have been cut and sewn. I purchased the sashing fabric after the August Inspiration Club held at  Pumpkinvine Quilting. (Designated fabric purchases are ok.) A soft yellow is the color I’ve gone with and I’m using the blue fabric leftover from Jane for the cornerstones.

The yellow shows lighter here than it actually is, but in the block photo below, it shows brighter than it actually is.

IMG_5475

The side sashings have been sewn to block 1. The other pieces are pinned on the design wall. (I have to pin them in the summer because the ceiling fan blows them off the wall!)

IMG_5485


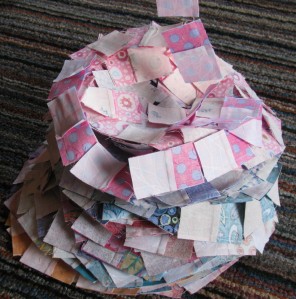
The 2-patches have been sewn into 4-patch blocks. They need to be pressed but they are the lowest priority project. I’m always intrigued when I chain stitch blocks, how they spill over the edge of my sewing machine cabinet, onto the floor and then drape into a beautiful swirl.

The 600 HST’s for the Cherry Blossom quilt are ready to go. There seems to be an overabundance of brown fabric. I’ll probably piece half of the block B’s and then decide if I need some color changes for the last bunch.

IMG_5497The main focus these weeks has been on marking Jane so she can go in the quilting frame the first Saturday in September. But I decided not to wait until September and got her into the frame last Saturday.

I used a very fine point blue marker to mark the quilting. It doesn’t show in the picture but it is dark enough for me to see when I quilt. The first thing I did was to baste stitch the outside edge. I had marked a line for this and when she is bound, I will lay the edge of the binding on the basting thread.

IMG_5498
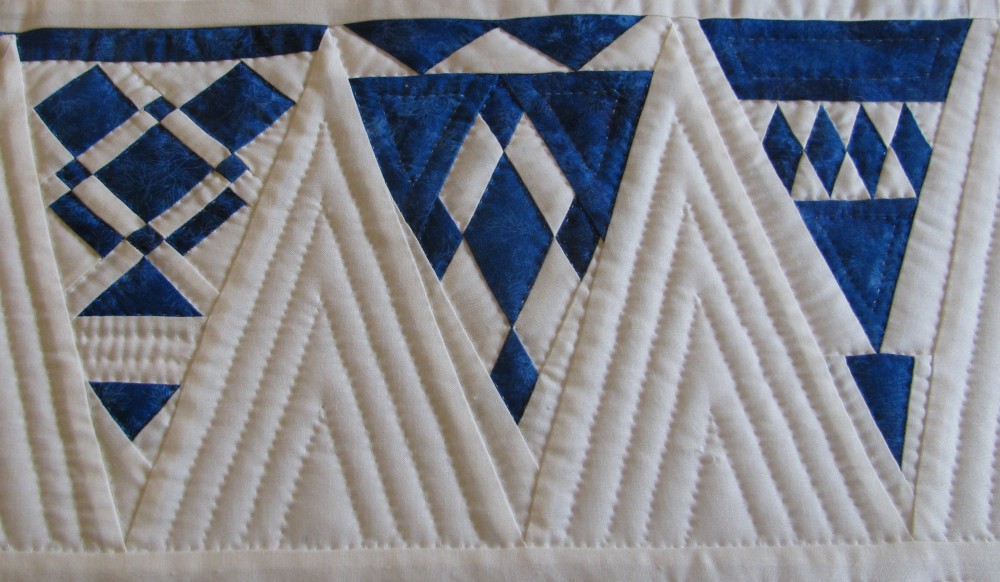
My Jane has feather borders because I don’t like the scallops that were on the original quilt. I had originally planned to use a different feather stencil and she would have had a scalloped border but I changed my mind. I ran into Donna Kooistra at the AQS show in Grand Rapids and asked her thoughts (as a quilt appraiser) on my plan for the markings. She mentioned several things to take into consideration and one of them was the size of the feather compared to the pieced blocks. After I was home, I compared the quilting stencil to the pieced blocks and the feathers were too large in comparison. I bought several more feather stencils and this was the one that looked the best. So, the border is going to be straight, not scalloped.

I will be posting weekly progress on my quilting. I have no idea how long the quilting will take.