Archives

Quilting Jane, Row E

Can you feel my anticipation? I see the end nearing, just 3 more rows to quilt! The thread yardage count is up to 618 yards and here are the completed blocks from row E.

IMG_0207
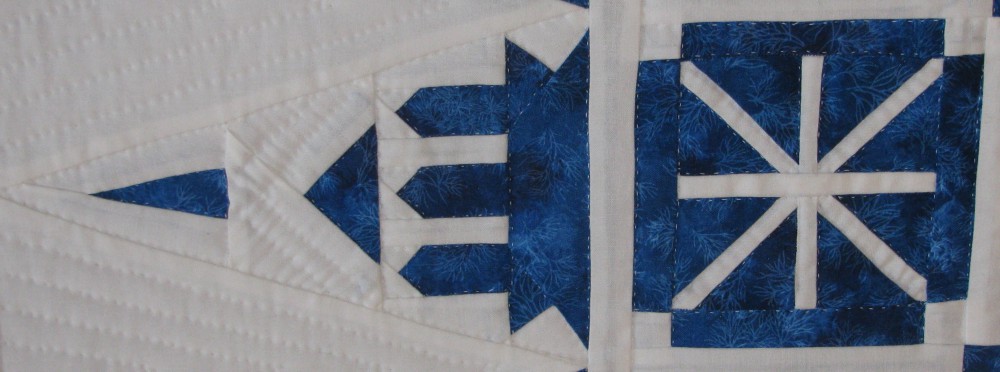
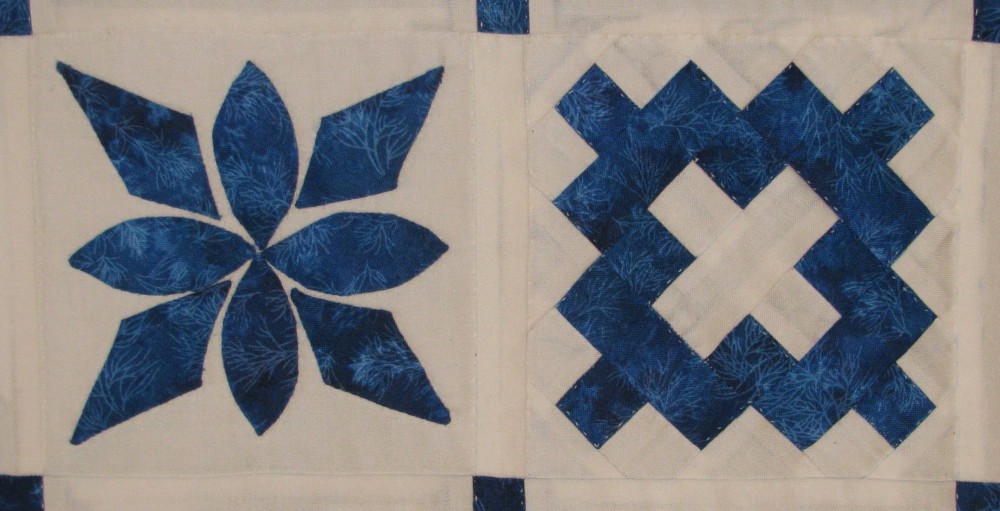
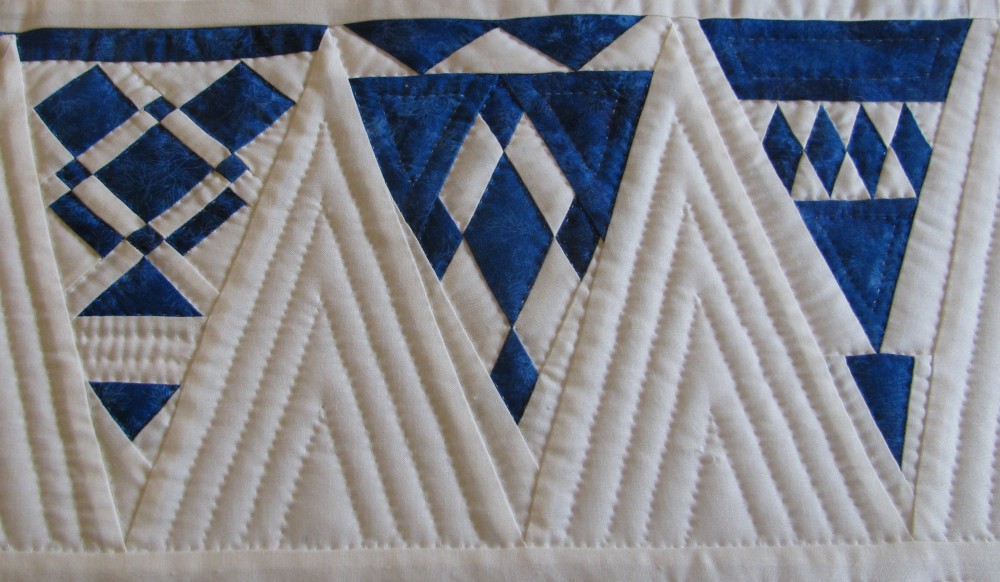
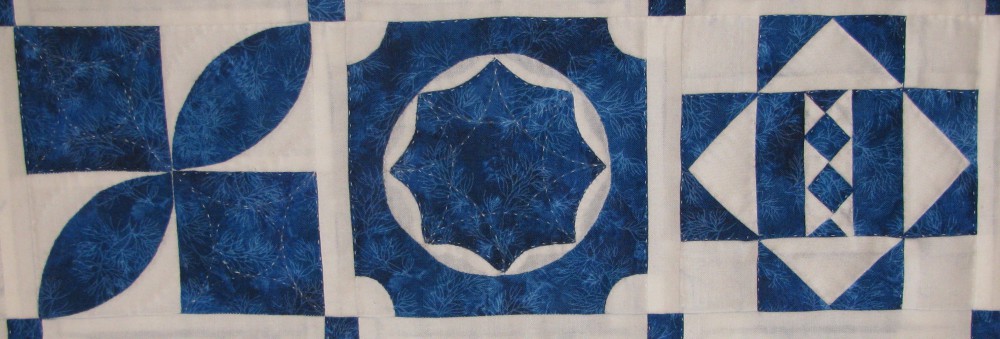
Left side triangle 9 and block E1. LS triangle 9 is just stitched in the ditch. I added some curves in the blue bottom. E1 is also stitched in the ditch and then I outlined the curves on the inside of the melons and a little background quilting.

IMG_0206
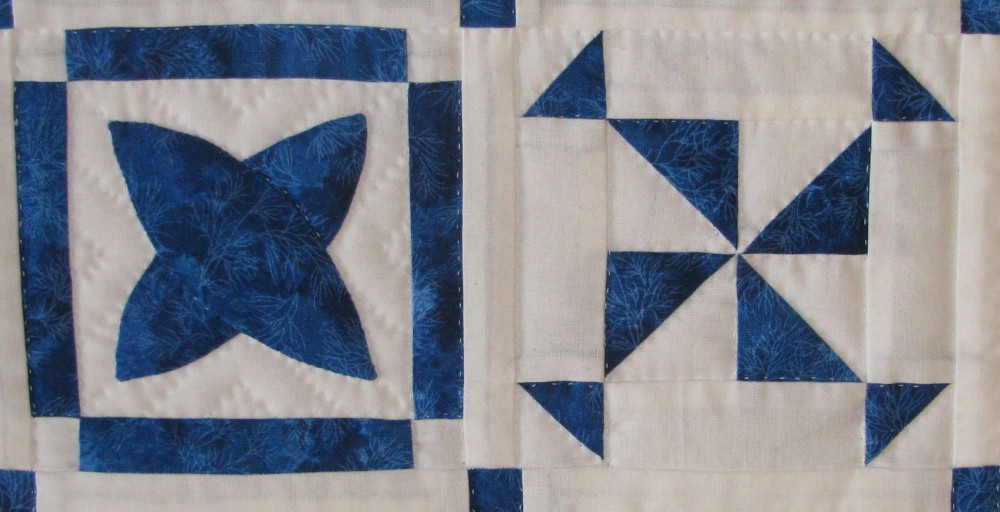
Blocks E2 and E3. E2 is stitched in the ditch with background quilting. E3 is completely stitched in the ditch. I like that pinwheel in the center.

IMG_0205
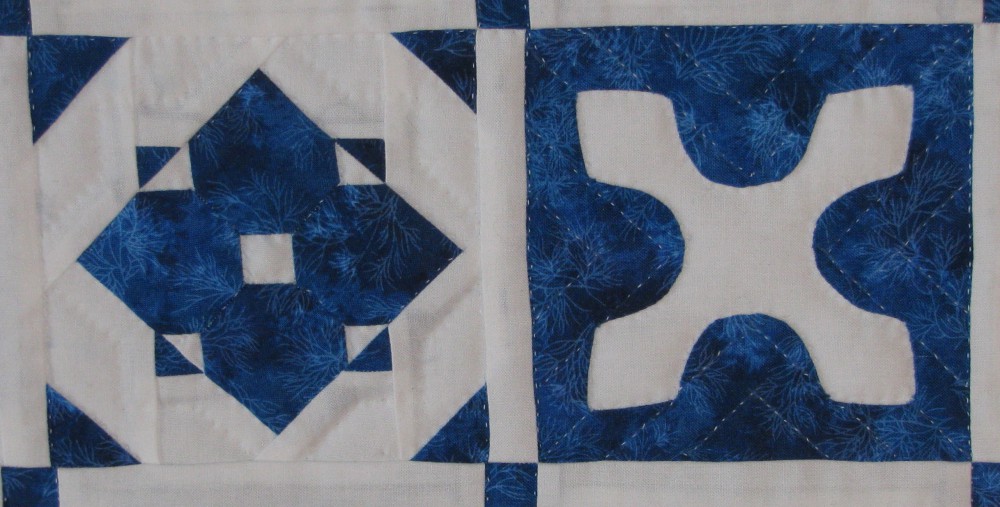
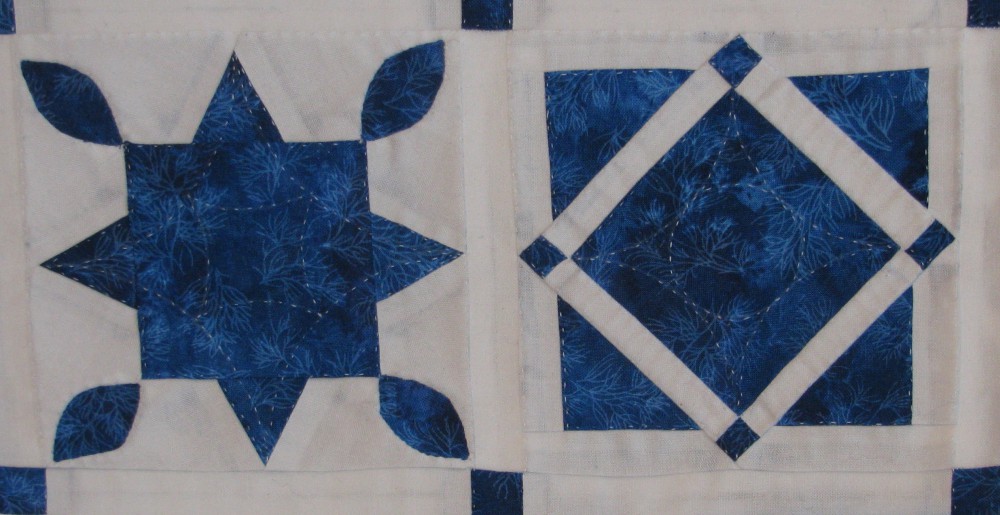
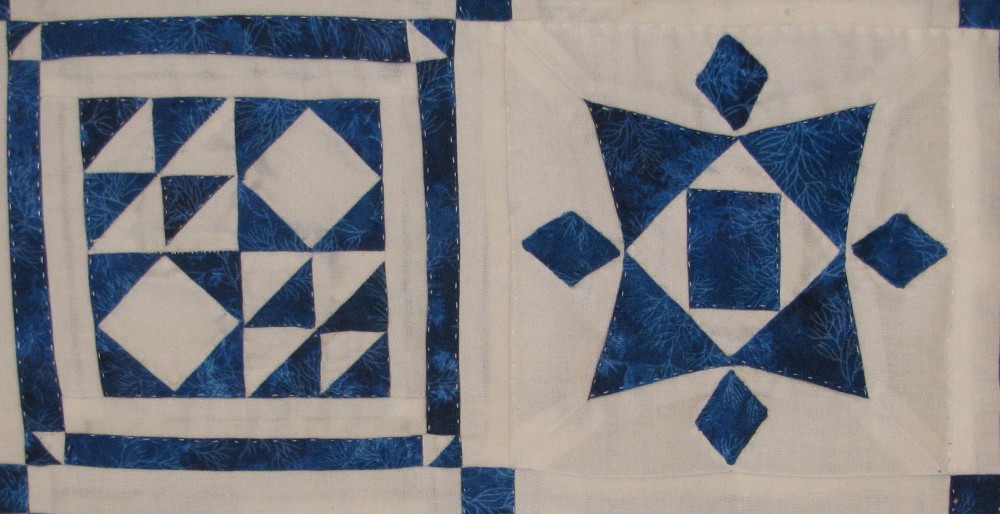
Blocks E4, E5 and E6. E4 is stitched in the ditch with background outline quilting. I also used my perfect circle templates and made an elongated curvy  square in the diamond. I like the loops that were formed on the 2 pointy ends of the diamond. E5 is stitched in the ditch and is very aptly name, Rising Sun. E6 is stitched in the ditch with lines radiating out from the corners in the background fabric. My appliqued squares actually look like squares too!

IMG_0204
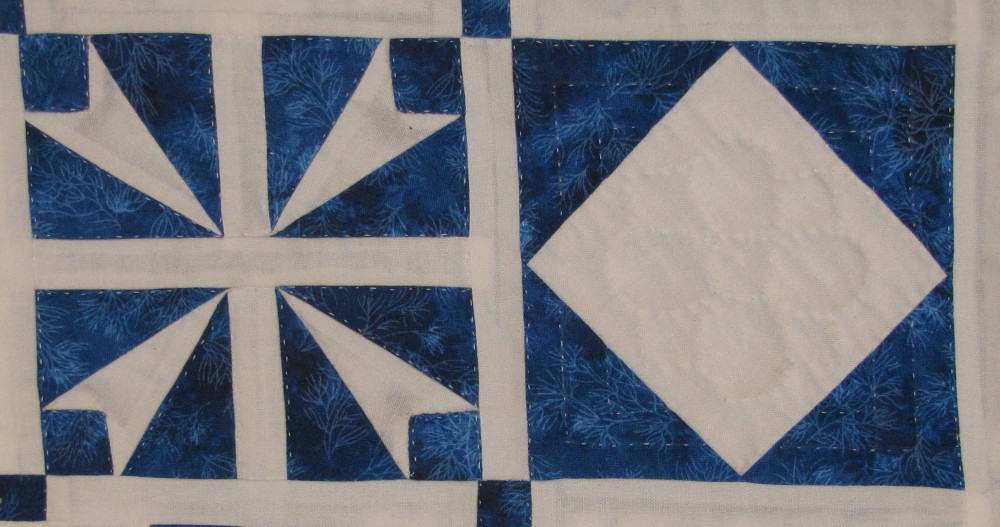
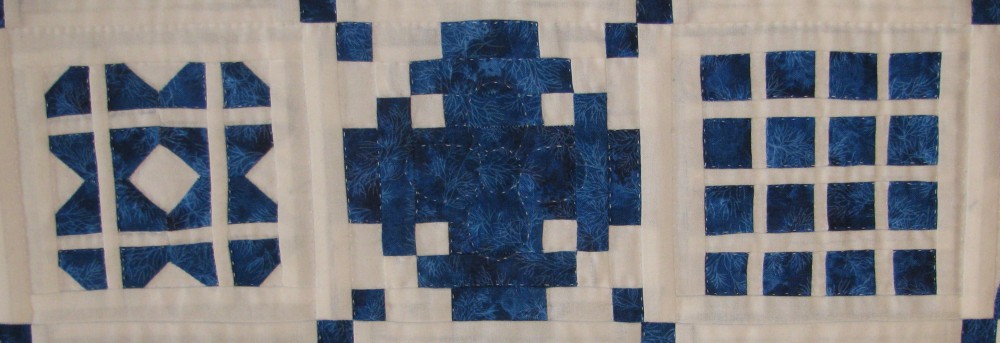
Blocks E7, E8 and E9. E7 is stitched in the ditch. E8 is just a weird block. The center was large enough I could quilt a flower in there. The rest of the block is stitched in the ditch. E9 is all stitch in the ditch.

IMG_0203
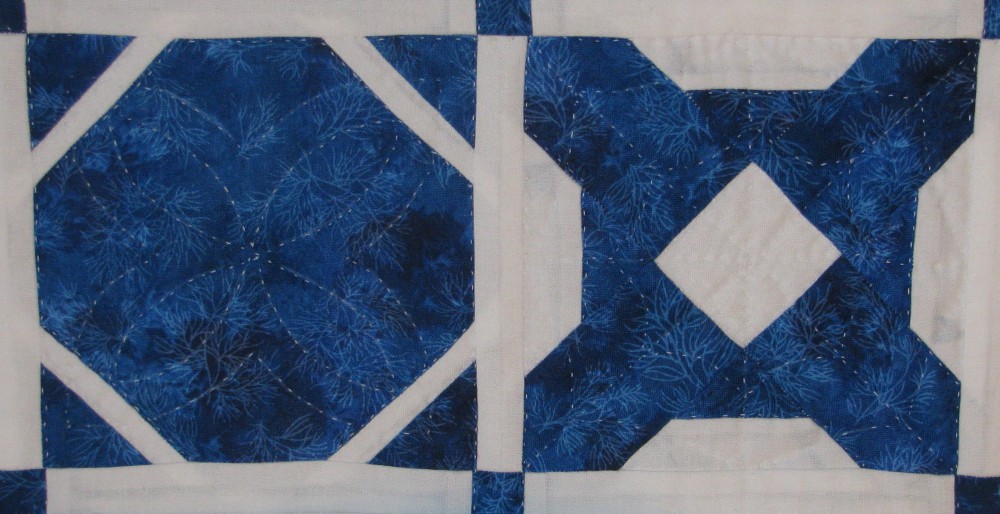
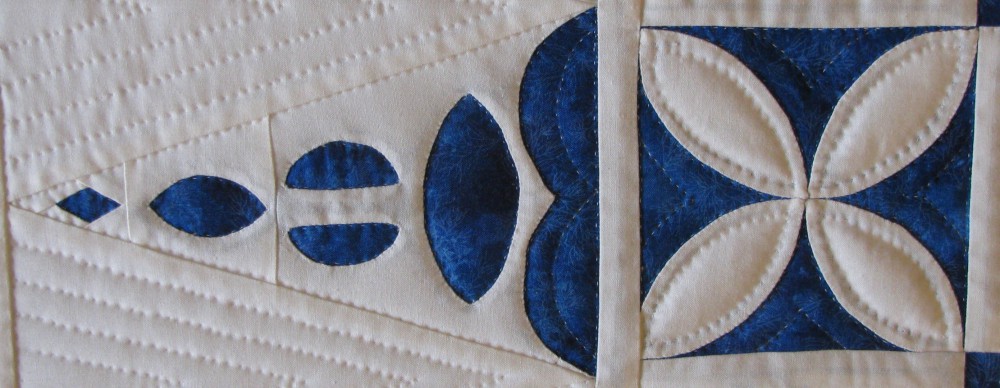
Blocks E10, E11 and E12. Click on this photo to see the quilting details. In the squares of E10 I quilted curvy squares and added a circle in the inside. Stitched in the ditch around the melons. I thought about outlining the inside of the melons like I did in E1 but decided not to. Curves were quilted in the center of E11 and made this pretty design. E12  was stitched in the ditch.

IMG_0202
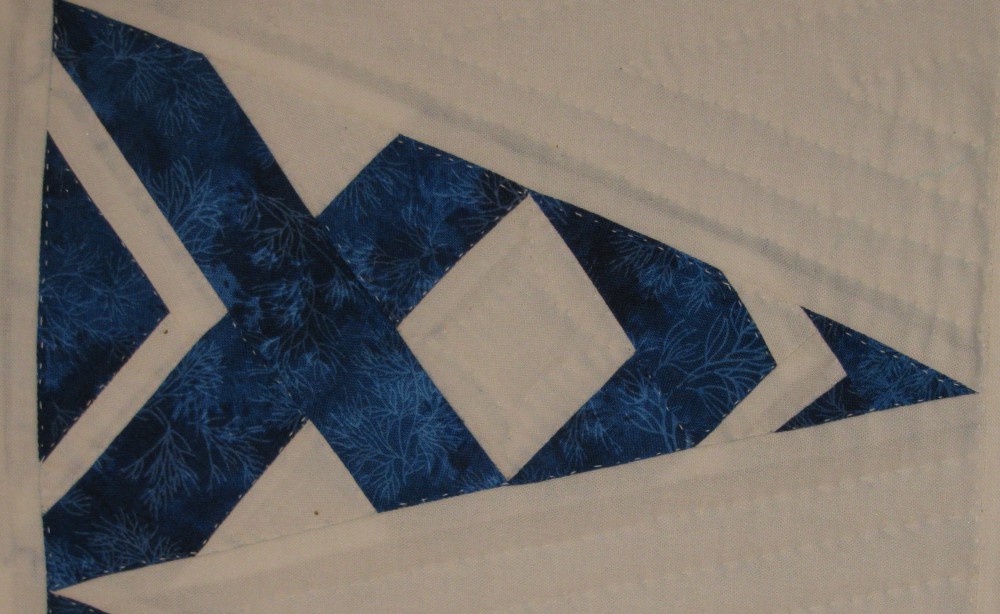
Block E13 and right side triangle 5. E13 does look like a moth or butterfly in the center so Moth in a Web was a good choice for the block name. She was stitched in the ditch and outline quilted in the background. RS triangle 5 was also stitched in the ditch with some addition quilting in some of the larger pieces.

It is a good thing I don’t mind stitching in the ditch!

IMG_0208
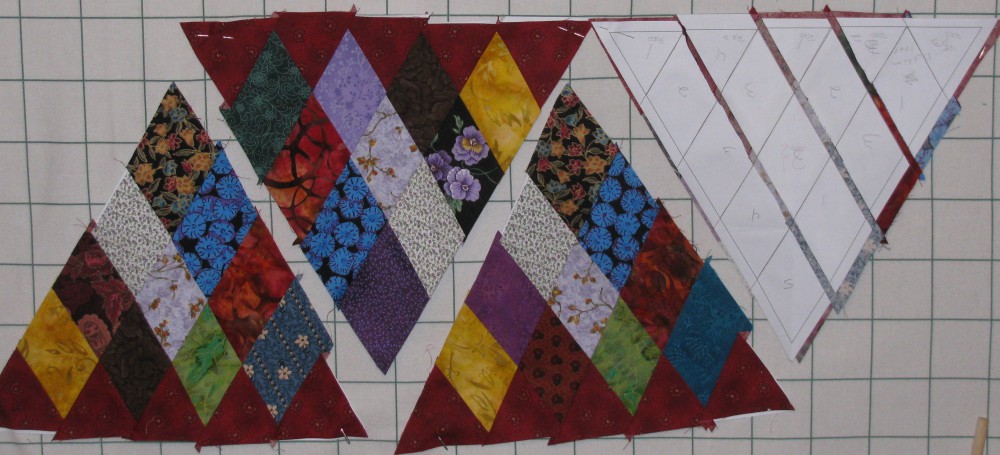
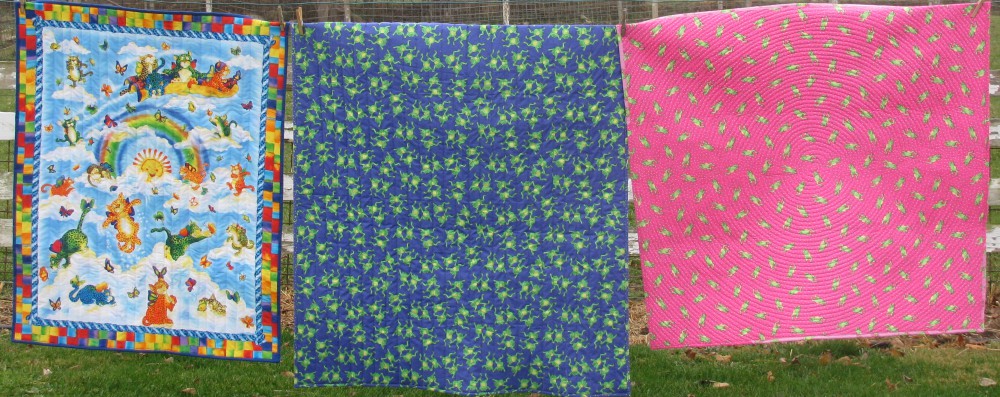
These are the last of the charity projects I have been working on. Kits for crib quilts were brought to guild in September. They just needed to be put together and quilted and this is what I came up with. The left quilt and the center quilt are both quilted with straight line quilting on my home sewing machine.

I decided to do something different on the right quilt for variety. This fall, on another blog, I saw a quilt that was quilted in a spiral. Of course, I didn’t remember which blog it was anymore and I do remember the quilter saying she had taken a class somewhere, but not me! I just jumped in and learned by trial and error. The spiral takes a lot of thread, make sure you have a LOT of bobbins wound and ready to go. The quilt doesn’t lay/hang flat and the inside isn’t the same width/length as the outside. But still, I think it does look interesting.

Linking to Esther’s Wednesday Wow, Freshly Pieced, Kathy’s Slow Sunday Stitching and Quilting is More Fun than Housework.

Quilting Jane, Row D

I’m starting to get pretty excited, with just 4 more rows to be quilted, the end is in sight! Row D has been completed and I’ve used a total of 575 yards of thread to date.

IMG_0200

Left Side Triangle 9 and block D1. I stitched in the ditch on these blocks.


IMG_0199

Blocks D2 and D3. Block D2 I did an outline in the white background then stitched around the blue flower. I made a mistake when I pieced this block. The outside corners of the blue flower were supposed to also have had a white triangles sewn on them. I missed that and came up with this design. I think it is cute and just adds originality to my quilt. D3 is stitched in the ditch in the white center and straight line quilted in the blue background.

IMG_0198Blocks D4 and D5. I outlined the star in the white background fabric and stitched in the ditch around the melons. Then using my perfect circle templates, I drew the center design. I really like it. Block D5 has a similar star in the center but I added a circle instead of a curvy square. The rest of this block is stitched in the ditch.

IMG_0197Blocks D6 and D7. I used one of my quilting stencil designed for the center of D6 and extended the quilting into the corner triangles. I also stitched in the ditch on the white strips. For block D7 I used a spiderweb stencil but it doesn’t show very well. I also stitched in the ditch around the white center and the outside of the blue.

IMG_0196Blocks D8 and D9. Block D8 was a simple stitch in the ditch around the applique pieced and D9 was stitched in the ditch around the outside of the album and on the inside around the white center. I did an outline stitch in the white background.

IMG_0195Blocks D10 and D11. Both blocks were completely stitched in the ditch. I thought about adding more background quilting in D11 but decided not too.

IMG_0194Blocks D12 and D13. D 12 is completely stitched in the ditch. The center of D13 was big enough I could quilt this flower. I added some quilting in the blue background.

IMG_0193Right side triangle 4. This triangle was stitched in the ditch. I quilted a curvy square in the center square.

I think this row had the most blocks with center spaces that needed quilting. This was a fun row to quilt.

IMG_0201I also worked on another charity project. Our guild is making the Sweet Surrender quilt designed by Sue Cody of Dragonfly Studio. I appliqued several triangles several months ago. The applique blocks are alternated by pieced triangles. I had pieced some triangles in October but didn’t post about them. The committee still had triangles to be pieced so I took 4 more. The directions tell you to EPP the pieced triangles but that takes awhile. One of the women showed the pattern to a draftsman at the factory where they work. He drafted a foundation paper pieced pattern which is a LOT faster than EPP. The triangles aren’t squared up and I don’t have to remove the paper, the committee will do that.

I’m linking up with –

Esther’s Wednesday WOW

Freshly Pieced

Kathy’s Slow Stitching Sunday

Quilting is More Fun than Housework! (This is so true!)

Love, Laugh, Quilt

Cooking Up Quilts

Charity Wallhanging

Over this past fall I’ve been accumulating charity projects to be worked on. I decided it is time to complete them and move them out.

The first project was this small wallhanging, designed and appliqued by Frances Stauffer. Frances was a very prolific designer in our community. She died a few years ago, but left many, many small wallhangings to be quilted and then auctioned at the Michiana Mennonite Relief Sale.

IMG_0192Someone had done some preliminary outline quilting on this little quilt, but it needed more stitches. I added the clam shells in the sky and quilted my version of echo quilting in the grass and pond. I’ve never done echo quilting before, and my echo lines aren’t as close as they should be, but for a first time, I think it is pretty good. They hadn’t quilted at all in the border so a cable was quilted there then I finished her with brown binding.

I used black thread for the quilting on the border and it was hard for me to see on the dark green. I think my days of quilting with black thread on dark fabrics are finished.

Charity project #1 is a complete and onto project 2.

I’m linking up with –

Kathy’s Slow Stitching Sunday

Quilting is more Fun than Housework

Love, Laugh, Quilt

Cooking Up Quilts

Freshly Pieced

Esther’s Wednesday Wow

Charity Applique Blocks


I’ve enjoyed appliqueing these charity blocks.

IMG_0017This is Triangle 15, my favorite of the four. I didn’t really have a color scheme, I just appliqued fabrics that I thought looked nice. The background fabric is from my mother’s stash.


IMG_0019Triangle 4. The background fabric is a light blue fossil fern fabric. I also did Triangle 3 on the same fat quarter. Even though triangles 3 and 4 normally would be next to each other, since the guild is making a full size bed quilt, we are making additional blocks. My blocks 3 and 4 will not be next to each other in the finished quilt.

IMG_0018And Triangle 3. This is the disappointment block. I decided I was going to try some broderie perse. I don’t know if I did it the right way, I made it the shape of the flower that was supposed to have been EPP’d. I used mom’s older Asian fabrics and they just aren’t as bright and colorful as the newer Asian fabrics. Oh well, it’s finished.

I showed you triangle 16 in this post.

The 4 blocks are finished and I’ll return them to the charity committee during guild Monday evening.

I’m looking forward to starting my Sweet Surrender triangles, but before I start them, I have another applique project I want to make first, just for fun. I’ll show you how far I get with that project next week.

I’m pleased with the quilting progress on my Jane Stickle quilt. So far I’ve been able to quilt a row a week. I don’t know if I’ll be able to keep it up but I’m going to try. I would really like to have her finished to take along to the Jane Stickle retreat in April.

Last week I showed you the Stars and Sprigs quilt my guild made and donated to the Michiana Mennonite Relief Sale. The sale was held yesterday and she brought $2600. The photo used in the post was taken by Marie Troyer. Thanks Marie for sending me the photo and my apologies for not giving you the credit.

Linking up with Kathy’s Slow Stitching SundayLove Laugh Quilt, Quilting is More Fun than Housework, Quilt StoryA Quilting Reader’s Garden and Esther’s WOW.

Stars and Sprigs

IMG_20150824_192055015Every year the Maple Leaf Quilt guild makes and donates a quilt to the Michiana Mennonite Relief Sale quilt auction. At the September guild meeting this year’s finished donation was displayed. Here she is, Stars and Sprigs, designed by Kim McLean.

This quilt pattern has both pieced and appliqued blocks, so the piecing people were happy and the appliquers were happy. This quilt was very much a group project. I appliqued four of the applique blocks and also helped with the some of the quilting.

I’m hoping there are 2 people at the auction who really want this quilt. Update 9-27-15 – She sold for $2600. The photo was taken by Marie Troyer.

Also at the guild meeting, the committee in charge of the 2017 donation quilt presented information about the new relief sale quilt. The pattern is Sweet Surrender designed by Sue Cody.

Several of us in the guild are also going to be piecing and appliquing this pattern to make our own quilt, so the guild blocks will be good preparation.

I finally got all the siggie blocks signed so now I can start on the guild blocks. I’m appliquing triangles 3, 4, 15 and 16. This is going to be a scrappy quilt and we are NOT to use white for a back ground.

IMG_0008Triangle 16 is completed. I tried to use brighter colors than I normally use. They worked well on this yellow batik. The little circles are dark red not black. The pink flower is EPP’d using 5/8th” papers. I thought it turned out cute, especially with the fussy cut butterfly center. These triangles are going to be a fun project.

I’m linking to Crazy Mom QuiltsKathy’s Quilts, Slow Sunday Stitching, Cooking up QuiltsLove, Laugh, Quilt and My Quilt Infatuation.

Quilting Jane, the Bottom Triangle Row

When the two side feather borders of Jane were quilted, up to the 6th row, I started on the bottom triangle row. I’m not doing anything special in the pieced triangle blocks, mainly stitching in the ditch and then outlining in the larger pieces. I’m using the same idea for quilting the white alternate triangles that Jane did in her quilt, inverted V’s. From what I can see, she had 3 V’s in her quilt so she must have marked for 3/4″ lines. I’ve marked mine at 1/2″ so I have 4 V’s.

Click on the photos to enlarge them.

IMG_5507


Here is my progress so far. Bottom left corner and 1st Bottom  Row triangle


IMG_5508


Bottom Row triangles – 2, 3 and 4


IMG_5509


Bottom Row triangles – 5, 6 and 7


IMG_5510


Bottom Row triangles – 8, 9 and 10


IMG_5511


Bottom Row triangles – 11, 12 and 13.


IMG_5512

Bottom Right Corner

Some of the triangles look so crooked, especially triangles 10 and 13. They really aren’t crooked, it must be the angle of the camera. Yards of thread used so far – 108.


IMG_0001I’ve been sewing the HST’s together for the Cherry Blossom quilt and I made 6 flannel receiving blankets for charity. I’m almost finished signing the siggie blocks then I have another hand project to start.

I’m linking up to Esther’s WOWKathy’s Quilts, Slow Stitching Sunday and Cooking up Quilts.


The Jane Stickle Quilt Retreat

I’ve been home for several days from the quilt retreat. The retreat was formerly called the Dear Jane Retreat but at the November 2014 retreat, Brenda Manges Papadakis requested that we no longer use that name. We are a congenial group so of course we have acquiesced to her request and selected a new name, The Jane Stickle Quilt Retreat. Same group, same interests, same location, just a new name.

A week ago yesterday, I loaded up my car and headed off to Shipshewana to the Farmstead Inn anticipating 5 days of sewing, visiting, laughing, shopping and, of course, eating! I was NOT disappointed and this was the best retreat so far. They just keep getting better and better! Ninety-four quilters had plans and reservations to attend, but there is always illness and other factors that happen so we ended up with ninety in attendance.

IMG_5245There were several ladies working on the La Passacaglia quilt from the Millefiora Quilt book by Willyne Hammerstein.

This first star is English Paper pieced.


IMG_5246This star is pieced using inklingo. I’ve never tried inklingo but maybe I’ll give it a go sometime. It would certainly be faster.


IMG_5247I only saw one person actually working on Lucy Boston’s Patchwork of the Crosses by Linda Franz.

There were several other who had brought their blocks along to show others.

I’m going to EPP this quilt someday. I’ve been collecting border fabrics so I can make fussy cut blocks.


IMG_5248This was a hand sewn Grandmothers Flower Garden variation. I think she said she started it 20 years ago and is determined to complete it this year. She was removing part of the  white blocks so it wouldn’t be double white.

She just laid out the blocks for me to take a quick picture.


There were many other projects going on including several people working on their Jane Stickle quilt blocks but I don’t have any pictures of those projects.

IMG_5249Here are the projects I worked on. First I pieced a little quilt from the Prairie Women Journey 3 class I took a year ago. It measure 25″ by 30″.

I always do prep work at home and had already sewn the HST’s and cut the other pieced needed.


IMG_5250During the Shipshewana Quilt Festival they hold a Shop Hop. The shops involved request the participants piece and donate a designated quilt block. These blocks are sewn together into charity quilts and donated to various agencies in the LaGrange County area.

Last year’s shop hop block was a simple HST using a 5″ block cut in half. They were overwhelmed with blocks and are still working on getting them sewn into quilts. I was asked if I would be willing to make a crib quilt. I said yes and came up with this lay-out. The quilting is simple stitch in the ditch. I used leftover batting strips sewn together and put a medium blue flannel on the back. Looks cute and has been dropped off at the quilt shop.

IMG_5256It didn’t take long to finish the UFO I had sewn into rows in March. I was so excited to have her finished and placed her on the floor in the hallway to be admired. (We do a lot of oohing and aahing during the retreat.) Someone asked me if I meant to place the block like that? Uh oh, which block? The block in the top left corner is turned incorrectly. I quickly responded that was my “humility” block. For now she is staying like she is. She won’t be taken to the long arm quilter until fall and I’ll probably decide to correct the positioning, but maybe I won’t. Perfection is sometimes overrated. How often do we see an antique quilt with a block turned the wrong way? This quilt will end up with one of the grandchildren someday and they can just laugh about granny’s mistake.

IMG_5259Last summer at the AQS show in Grand Rapids, Michigan, I bought a kit called Snowman Love from the Red Button Quilt Co. booth. I pieced the little quilt at the guild retreat in February and saved the hand sewing for the April retreat.

The embroidered design in the border was supposed to be a free hand curvy line with little curly curls. I’m not good at free hand so pulled a small quilt stencil from the stash and marked it.These are Amish snowmen. I’m not going to embroider faces on them. The hand quilting will take place sometime this summer.


IMG_5253


Of course I pieced some little 9-patches,


IMG_5260


And a lot of strips to be cut into sections for more 9-patch blocks at home.


I’m going to give you a link to  Rosemary Youngs blog. Click on the smilebox to see all the quilts shown at show & tell. This is beyond my computer skills but Rosemary does a fantastic job.

The days away at the retreat were a wonderful end to my winter. Now it is back to work.

I have 1 more row of the center part for the Jane Stickle quilt to be pieced before the first of May. The grass grew while I was gone and now the yards need to be mown. The rhubarb is ready to be cut and, surprise!, the asparagus is ready to eat too!

IMG_5225Just a couple more pictures. As I was loading the car to leave for the retreat, the Farmer opened the gates and let the cows down into the bottom pasture. They were so happy (me too!) and I snapped some quick photos.

IMG_5227

IMG_5228

Perkiomen Valley Scrappy Quilt

Last Fall I mailed a quilt top to a cousin in Kansas to be quilted then donated to the Kansas Mennonite Relief Sale. It has been quilted, photographed and listed in the sale booklet. Kansas has a website that shows all the quilts listed in the booklet. She is listed as #218.  The Kansas Relief sale is April 17th and 18th.

Perkiomen Valley is made out of split 9-patches and was Bonnie Hunter’s 2013 Leader & Ender challenge quilt. The post and free pattern are here. I think I told the sale committee the name of the quilt was Perkiomen Mountain but Bonnie says it is Perkiomen Valley. It shouldn’t make any difference at the sale.

I used a lot of leftover fabrics in this quilt but it didn’t even make a dent in my stash.

Two Finishes!

February is a short month anyway but with me being gone a week to Tempe and then 4 days to a quilt retreat, it didn’t leave a lot of time for concentrating on Dear Jane blocks so I worked on other projects.

IMG_5163I sewed the bindings on these two wallhangings. The pink/brown is the original Buck A Block project and I made the blue/brown one with my own fabrics. Tammy Payette, Three Sisters Fabric, quilted them both with a stippling design. I don’t need 2 wall quilts of the same design so IMG_5162 the pink and brown one will be donated to the Michiana Mennonite Relief Sale in September.


IMG_5165


I enjoy watching Love of Quilting on our local PBS channel. Several years ago Jo Morton was on and she demonstrated her way of making HST blocks out of 5″ charm blocks. You will get 8 blocks from 2 charm blocks, what a great idea! So two years ago at the guild retreat, I sewed a pack of charm blocks up into 2″ HST which will finish at 1-1/2″. However, they do need to be trimmed so I started trimming them. Ugh! I got tired of that fast and put them away. I’ve had them on a table in my cutting room ever since. I finally finished trimming them! I have a project in mind that needs over 2000 1-1/2″ finished HST. So far I have around 300 of them, I might reduce the size of that project.

IMG_5027This table has needed to be cleaned off for a long time! I’m working on reducing the ‘stuff’ on this card table starting with the basket in back. (The HST triangles I made by Jo Morton’s method were buried in here too)

When I finish sewing a project, I put leftover yardage away, but all smaller pieces are put into the basket until is full; well, actually it is full, running over and spilling onto the table. I cut these scraps into strips or blocks. The 1-1/2″ strips will be used for little 3″ finished 9-patch blocks.

IMG_5169The table is cleaned off and organized. I’ve cut up the fabrics in the basket and they have been placed in the correct box according to size. Since I’m only working on 2 projects this winter, this should stay neat and tidy. I’ve also decided that I am going to organize leftover fabrics after I finish each project and not accumulate them in the basket. Guess I don’t need that basket anymore then.

IMG_5170I admit I am getting tired of just 2 projects so it was nice to have a break at the guild retreat. After I finished organizing the cutting room, I got out an old project. I think I might have sewn these blocks 8 – 10 years ago, I really don’t remember how long it was. Anyway, the rows are finally sewn (diagonally) together. I do have 10 more blocks with the light color and will add them at a later time. That will make the corners kind of wonky but I think I can make it work. I still had the fabric with it for the inset triangles. I’m excited about this project. It is definitely going along to the next retreat.

Now it is time to get back on  the Dear Jane blocks but I’m going to have to increase production to two rows a month. There are a group of applique addicts in my guild. They often select the same pattern to applique but put their own individuality to it. They showed me what pattern they are considering next, Sweet Surrender by Dragonfly Studio. I thought I might join in since they won’t be starting until January 2016, but I need to get Jane pieced first!