Archives

Embroidered Quilt is Pieced

IMG_5473Several months ago, I showed you some quilt blocks I had embroidered years ago. They were sewn together and the quilt needed to be wider. I solved the problem by adding two side borders with flying geese, then a blue border, then a checkerboard border, ending with the blue fabric for the outside border. The top now measures 90″ x 98″, decent size for a bed.

The center blocks have yellowed some over the years. I plan to hand quilt this top someday, maybe by the time she gets quilted, the white fabric I’ve used will have yellowed too.

I know this isn’t a popular style of embroidered quilt but when she is quilted, she will have the quiet dignity that this style of embroidered quilt embraces. She won’t be quilted this winter but perhaps in a year or two.

Linking up with Kathy’s Slow Quilting on Sunday and then on Monday Super Mom-No Cape. On Wednesday I’ll link up with Esther’s Wow, then on Thursday My Quilt Infatuation.

Cherry Blossom Quilt


Summer is flying by and it is a very busy time here on the farm, but I have made some time for sewing.

IMG_5458I’m well on the way to recovering from my Jane burnout. I’ve progressed from just sewing strips together, to sewing the 3″ finished 9-patch blocks I pieced last winter into double 9-patches . . . 42 double 9-patches. These are block A for the Cherry Blossom Quilt.

IMG_5463I’ve pieced the centers for the IMG_5464
for the 30 B blocks. One inch finished HST’s are to be attached next. I have the Thangles ready to sew but it is going to take a while to sew the 600 HST’s needed.

The Cherry Blossom Quilt pattern was designed by Karen H. and you can find the pattern on her blog, faeriesandfibres.blogspot.com. Click on Patterns by Karen H. (She asks that links go directly to her blog.) She has some very pretty patterns she has designed.

The bindings are completed for the 4 little quilts I’ve quilted this summer.

IMG_5418The little Snowman Quilt is a kit I bought a year ago at the Red Button Quilt  Co. booth during the Grand Rapids AQS show in August. He measures 16 1/2″ x 19 1/2″. The middle two were projects from the Prairie Women Sewing Circle, year 3. I especially like the cheddar flange binding on the cheddar and black quilt. The cheddar/black quilt measures 25″ x 29 1/2″. I thought the next quilt was red and black but now I see the red doesn’t stand out as much as I thought it would. I should have added a red flange to the binding. The red/black size is 21″ x 25″. The right quilt was a free pattern from the Temecula Quilt Co. called the 12 Days of Christmas. He measures 18″ x 22″.

IMG_5419The backsides of the 2 left quilts. Both were hand quilted.


IMG_5420And the 2 quilts hanging on the right side. The left one was hand quilted and the right quilt was stitched on my sewing machine. I was too lazy to attach the even feed foot to my machine so it is not smooth. But that just makes it an interesting texture.


IMG_5471I decided I was going to use purple fabrics to piece the Seeing Stars BOM by Turning Twenty. I had planned to use a mixture of regular fabrics and batiks but when I started looking, I decided to go with just batiks. It’s amazing what beautiful fabrics we can find in our stashes if we just look. Some of the batiks look blue but have some purple shading in them.

Seeing Stars is a 6 month BOM with 2 patterns coming a month. I’ve downloaded the first 4 patterns but I’ll wait to start until I have the next 2 patterns. I’ll have a busy week of piecing the blocks, then put it all away until I have the rest of the patterns. BOM’s are fun but they get too draggy sometimes, at least it seems that way to me. I’m more of a get ‘er done sort of person.

IMG_5472The 1-1/2″ strips I have been sewing are sewn. Now I’m sub-cutting them into twosies. It doesn’t take long, I use my mat with the 1/2″ slits, then I’ll sew them together and make 4-patches. This is going to be a very slow, very long-term piecing project. After I get the 4 patches pieced, I’ll decide what is next. I have several possibilities I’m turning over in my mind.

Linking up with Esther’s Wednesday WOW! and My Quilt Infatuation NTT and A Quilting Reader’s Garden.

Slow Stitching

IMG_5466Several weeks ago, I pulled out the resale shop crib quilt to work on in the evenings. I finished the applique, then I removed the green embroidery and re-embroidered the alphabet with a lighter green color. It didn’t make any difference, it still looks teale colored. I also embroidered the pink outline.

Earlier I had sprayed water on a section to see if the ink disappeared, it didn’t. So this is an old top that must have been printed 30 plus years ago. Back then they used permanent ink. Why? I don’t know but they did. Anyway, I think the blue ink makes the light green embroidery thread look more teal and it doesn’t match the green applique ribbon.

I asked DIL #2 what she thought. The greens didn’t bother her, but the ink did. Funny how we all notice different things. I had planned to add a border on the outside but she suggested just leaving it like it is, so I did. This winter I will attempt quilting it on my sewing machine.

IMG_5465Then I pulled out the pink hexies I started months ago and I’m hand sewing more of them. They will end up in a crib quilt too. People keep on having babies and I like having crib quilts ready to go for gifts.

Neither of these crib quilts will be WOW! quilts, but they will be loved and used. Nothing is better than that.

I’m linking up to Kathy’s Slow Stitching Sunday and then on Monday I’ll link up to Super Mom – No Cape! Stitchery Link Party.

Jane is Pieced!

Here she is, my version of the Jane Stickle civil war quilt.

IMG_5411

This isn’t the greatest of photos but it was the best I could do. I am not going to complain about having bright sunshine after all the dreary, rainy days we’ve had this summer!

I attached the borders on Saturday so Jane has been pieced in an 8 month time span. She is going to rest until sometime in August when she’ll be marked for quilting. The plan is to put her in the quilting frame and start the hand quilting in September. It will take as long as it takes.

I’m burnt out on sewing right now so I’ve started sorting through my project tubs. I’m weeding out quilt projects that I no longer want to make. It is interesting how the bright colors I like now are so different from the jewel tones I liked 10 – 15 years ago. Some of the fabric, along with a box of books, will be donated to the Relief Sale in September.

It feels good to have downsized and I hope I can hold firm in my resolution to only purchase fabric when I have a designated use for it.

I’ve linked to Esther’s Wednesday Wow! She’s weeding out her stash too. I’m also linked to Confessions of a Fabric Addict, Richard and Tanya QuiltsA Quilting Reader’s Garden, Simply Pieced, My Quilt Infatuation and Crazy Mom Quilts.

This is a LOT more links than I normally link to, but I want to whole world to know, Jane is pieced!

Red Radiance is Finished!

The binding and label have been attached to Red Radiance and she has been added to the Projects Finished list. Having a finish gives me such a sense of accomplishment!

IMG_5387

The pattern for Red Radiance came from the December 2000 issue of American Patchwork & Quilting magazine. She was designed by Betty Alderman, Cindy Oates and Laurene Sinema.

IMG_5384I’ve also completed the rest of the triangles for the right side border for the Jane Stickle quilt. These 6 triangles all have applique of some sort, some more than others.


The border with the alternate white triangles.

IMG_5385

IMG_5386

What hand project am I going to work on now? I’m not going to start a new project. I have several small tops that need to be quilted and they will be going into the quilting frame but not this week-end. This week-end I’m enjoying time with our son from upper New York state and our grandson.

I’ve linked up to Kathy’s Slow Stitchin Sunday and Sew Many Ways.

Medallion Quilt Top

IMG_5295One of the projects I wanted to complete this May, was borders for this Medallion quilt top designed by Edyta Sitar. I like her projects. The problem is most of them are for “throws” not bed quilts so I needed to make it larger. Nothing jumped out at me and said This is the border! I finally decided to attach  white fabric and quilt a design on it.

I had purchased a border print several years ago for the outside border. Unfortunately the colors of the border print didn’t blend nicely with the scrappy colors of the pieced blocks which was rather frustrating. I pulled out fabrics that I thought might work and I finally ended up using this reddish-maroon fabric. I’ve had it for a long time, in fact the selvage reads Joan Kessler – 1994 for Concord Fabrics.

The fabric is more attractive in real life than in the photo. Here is a link to a picture of the fabric.

I want to hand quilt this quilt and I’m hoping that happens in the fall.

Applique Quilt

During my month’s sabbatical from the Jane Stickel quilt, I’m trying to finish some projects and finally sewed the binding on this quilt.

IMG_5291Applique was always a skill I had wanted to acquire, but never did. The Maple Leaf Quilt guild gladly taught me several techniques for applique. I was hooked and ready to go.

I decided I would make an applique quilt for our daughter and this is what I came up with. The designs for the blocks came from many different sources. When the blocks were sewn together, the top formed a square and I don’t like square quilts. I looked through some of the patterns I brought home from my mother’s stash and found the simple flower design that is on the top border of the quilt. My applique had improved in the two years from the beginning of the quilt to the border applique. I can do more quality work now but this is where I was at in 2008.

I had always planned to hand quilt this project but that never happened. Late last fall I took the top to the Three Sisters  Fabric shop. Tammy Payette custom quilted her with beautiful feathers and returned her to me in January. I don’t think I could have hand quilted her this nice.

The details of the quilting show better if you click on the photo.

Linking up with Throw Back Thursday 10/1/2015.


The Jane Stickle Quilt Retreat

I’ve been home for several days from the quilt retreat. The retreat was formerly called the Dear Jane Retreat but at the November 2014 retreat, Brenda Manges Papadakis requested that we no longer use that name. We are a congenial group so of course we have acquiesced to her request and selected a new name, The Jane Stickle Quilt Retreat. Same group, same interests, same location, just a new name.

A week ago yesterday, I loaded up my car and headed off to Shipshewana to the Farmstead Inn anticipating 5 days of sewing, visiting, laughing, shopping and, of course, eating! I was NOT disappointed and this was the best retreat so far. They just keep getting better and better! Ninety-four quilters had plans and reservations to attend, but there is always illness and other factors that happen so we ended up with ninety in attendance.

IMG_5245There were several ladies working on the La Passacaglia quilt from the Millefiora Quilt book by Willyne Hammerstein.

This first star is English Paper pieced.


IMG_5246This star is pieced using inklingo. I’ve never tried inklingo but maybe I’ll give it a go sometime. It would certainly be faster.


IMG_5247I only saw one person actually working on Lucy Boston’s Patchwork of the Crosses by Linda Franz.

There were several other who had brought their blocks along to show others.

I’m going to EPP this quilt someday. I’ve been collecting border fabrics so I can make fussy cut blocks.
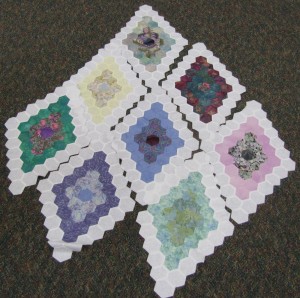


IMG_5248This was a hand sewn Grandmothers Flower Garden variation. I think she said she started it 20 years ago and is determined to complete it this year. She was removing part of the  white blocks so it wouldn’t be double white.

She just laid out the blocks for me to take a quick picture.


There were many other projects going on including several people working on their Jane Stickle quilt blocks but I don’t have any pictures of those projects.

IMG_5249Here are the projects I worked on. First I pieced a little quilt from the Prairie Women Journey 3 class I took a year ago. It measure 25″ by 30″.

I always do prep work at home and had already sewn the HST’s and cut the other pieced needed.


IMG_5250During the Shipshewana Quilt Festival they hold a Shop Hop. The shops involved request the participants piece and donate a designated quilt block. These blocks are sewn together into charity quilts and donated to various agencies in the LaGrange County area.

Last year’s shop hop block was a simple HST using a 5″ block cut in half. They were overwhelmed with blocks and are still working on getting them sewn into quilts. I was asked if I would be willing to make a crib quilt. I said yes and came up with this lay-out. The quilting is simple stitch in the ditch. I used leftover batting strips sewn together and put a medium blue flannel on the back. Looks cute and has been dropped off at the quilt shop.

IMG_5256It didn’t take long to finish the UFO I had sewn into rows in March. I was so excited to have her finished and placed her on the floor in the hallway to be admired. (We do a lot of oohing and aahing during the retreat.) Someone asked me if I meant to place the block like that? Uh oh, which block? The block in the top left corner is turned incorrectly. I quickly responded that was my “humility” block. For now she is staying like she is. She won’t be taken to the long arm quilter until fall and I’ll probably decide to correct the positioning, but maybe I won’t. Perfection is sometimes overrated. How often do we see an antique quilt with a block turned the wrong way? This quilt will end up with one of the grandchildren someday and they can just laugh about granny’s mistake.

IMG_5259Last summer at the AQS show in Grand Rapids, Michigan, I bought a kit called Snowman Love from the Red Button Quilt Co. booth. I pieced the little quilt at the guild retreat in February and saved the hand sewing for the April retreat.

The embroidered design in the border was supposed to be a free hand curvy line with little curly curls. I’m not good at free hand so pulled a small quilt stencil from the stash and marked it.These are Amish snowmen. I’m not going to embroider faces on them. The hand quilting will take place sometime this summer.


IMG_5253


Of course I pieced some little 9-patches,


IMG_5260


And a lot of strips to be cut into sections for more 9-patch blocks at home.


I’m going to give you a link to  Rosemary Youngs blog. Click on the smilebox to see all the quilts shown at show & tell. This is beyond my computer skills but Rosemary does a fantastic job.

The days away at the retreat were a wonderful end to my winter. Now it is back to work.

I have 1 more row of the center part for the Jane Stickle quilt to be pieced before the first of May. The grass grew while I was gone and now the yards need to be mown. The rhubarb is ready to be cut and, surprise!, the asparagus is ready to eat too!

IMG_5225Just a couple more pictures. As I was loading the car to leave for the retreat, the Farmer opened the gates and let the cows down into the bottom pasture. They were so happy (me too!) and I snapped some quick photos.

IMG_5227

IMG_5228

Perkiomen Valley Scrappy Quilt

Last Fall I mailed a quilt top to a cousin in Kansas to be quilted then donated to the Kansas Mennonite Relief Sale. It has been quilted, photographed and listed in the sale booklet. Kansas has a website that shows all the quilts listed in the booklet. She is listed as #218.  The Kansas Relief sale is April 17th and 18th.

Perkiomen Valley is made out of split 9-patches and was Bonnie Hunter’s 2013 Leader & Ender challenge quilt. The post and free pattern are here. I think I told the sale committee the name of the quilt was Perkiomen Mountain but Bonnie says it is Perkiomen Valley. It shouldn’t make any difference at the sale.

I used a lot of leftover fabrics in this quilt but it didn’t even make a dent in my stash.

Two Finishes!

February is a short month anyway but with me being gone a week to Tempe and then 4 days to a quilt retreat, it didn’t leave a lot of time for concentrating on Dear Jane blocks so I worked on other projects.

IMG_5163I sewed the bindings on these two wallhangings. The pink/brown is the original Buck A Block project and I made the blue/brown one with my own fabrics. Tammy Payette, Three Sisters Fabric, quilted them both with a stippling design. I don’t need 2 wall quilts of the same design so IMG_5162 the pink and brown one will be donated to the Michiana Mennonite Relief Sale in September.


IMG_5165


I enjoy watching Love of Quilting on our local PBS channel. Several years ago Jo Morton was on and she demonstrated her way of making HST blocks out of 5″ charm blocks. You will get 8 blocks from 2 charm blocks, what a great idea! So two years ago at the guild retreat, I sewed a pack of charm blocks up into 2″ HST which will finish at 1-1/2″. However, they do need to be trimmed so I started trimming them. Ugh! I got tired of that fast and put them away. I’ve had them on a table in my cutting room ever since. I finally finished trimming them! I have a project in mind that needs over 2000 1-1/2″ finished HST. So far I have around 300 of them, I might reduce the size of that project.

IMG_5027This table has needed to be cleaned off for a long time! I’m working on reducing the ‘stuff’ on this card table starting with the basket in back. (The HST triangles I made by Jo Morton’s method were buried in here too)

When I finish sewing a project, I put leftover yardage away, but all smaller pieces are put into the basket until is full; well, actually it is full, running over and spilling onto the table. I cut these scraps into strips or blocks. The 1-1/2″ strips will be used for little 3″ finished 9-patch blocks.

IMG_5169The table is cleaned off and organized. I’ve cut up the fabrics in the basket and they have been placed in the correct box according to size. Since I’m only working on 2 projects this winter, this should stay neat and tidy. I’ve also decided that I am going to organize leftover fabrics after I finish each project and not accumulate them in the basket. Guess I don’t need that basket anymore then.

IMG_5170I admit I am getting tired of just 2 projects so it was nice to have a break at the guild retreat. After I finished organizing the cutting room, I got out an old project. I think I might have sewn these blocks 8 – 10 years ago, I really don’t remember how long it was. Anyway, the rows are finally sewn (diagonally) together. I do have 10 more blocks with the light color and will add them at a later time. That will make the corners kind of wonky but I think I can make it work. I still had the fabric with it for the inset triangles. I’m excited about this project. It is definitely going along to the next retreat.

Now it is time to get back on  the Dear Jane blocks but I’m going to have to increase production to two rows a month. There are a group of applique addicts in my guild. They often select the same pattern to applique but put their own individuality to it. They showed me what pattern they are considering next, Sweet Surrender by Dragonfly Studio. I thought I might join in since they won’t be starting until January 2016, but I need to get Jane pieced first!