Archive | April 2015

An Embroidery Project

I find hand work in the evening very relaxing. Until I get Red Radiance marked for quilting, I’ve have been working on a couple other projects.

IMG_5261I sewed these 1″ hexagons flowers. Sometime I’ll use them in a crib quilt.


IMG_5262I was at a local resale shop last fall and stumbled across this crib quilt to be embroidered. The large letter A had some royal blue embroidery but wasn’t completed. I didn’t like that color and easily removed it. I’m going to embroidery the alphabet with the pink and green embroidery floss.

You can’t see it very well but there is a quilting design with a sash and hearts. I plan to applique the sash and hearts with the fabric displayed, a pale green and pink floral.

I’m hoping the outside embroidery row washes out because I don’t like it, but I have come up with Plan B in case it doesn’t disappear. A pink border will be attached after the inside is completed.

These are small projects and can easily picked up and laid down anytime.

Jane Stickle Quilt, Row M

I did it!!! The center is completed!

IMG_5264Row M, the pieced blocks. I realize the blocks are not in the correct order. After I trim each block, I lightly press the small picture that printed out on the freezer paper along with the pattern, on the back of the block. When I remove the blocks from the display wall, I check each one and make sure they are in the correct order. If they do get mixed up when I sew them into the row, well, they’re sewn together and I’m not going to take them apart.

IMG_5268And the completed center , except I do need to add the narrow border. I’ll get it done sometime. I wrote the date I pieced each block in the Dear Jane book. Block A 1 was pieced November 21, 2014 and Block M 13 was pieced yesterday morning, April 27, 2015. I’m pleased with my progress so far.

I am going to take a break from Jane for the month of May. There are other quilting projects I would like to work on this month in my extra time. I’ll let you know when I decide to start piecing the border triangles.

Artist of the Month

I am the April Artist of the Month at Yoder Department Store in Shipshewana, Indiana. They ask local people to exhibit items they have made and you don’t have to necessarily be a quilter. There has been a display of heirloom sewn children’s clothing and another display was all embroidered items. Both were beautiful.

Of course my exhibit is quilts. Some of these quilts you have seen before, some were completed long before I started my blog.

I have a total of 12 quilts/wallhangings on display. Ten of these are above a row of fabric bolts, as you will see in the bottom of some of the photos.

IMG_5236This is Peppermint Twist and is a Jo Morton pattern.

Janice Nelson was working on this project at the first fall retreat I attended in 2007. I thought it was beautiful and bought the book while I was at the retreat. The Farmer isn’t real great at Christmas shopping so I bought pink and brown fabrics. Our daughter wrapped them and that is what he gave me for Christmas that year.

This is one of my first applique projects and I hand quilted this quilt.


IMG_5233

Next on the list is this chicken quilt. A group of women from my guild went on a mission trip to Mongolia to teach sewing skills to a group of women. They made this pattern out of batik fabrics. I made a cash donation and received several raffle tickets in return. I did not win the quilt so I made my own. I don’t know the name or designer of this pattern.

IMG_5232


This is Edyta Sitar’s Medallion pattern. I made her with smaller HST’s than what the pattern called for. The Three Sisters Fabric shop, New Paris, Ind., did the quilting.


IMG_5239


Another Edyta Sitar pattern is Tree Farm. The addition of the outside border made this a twin sized quilt. The quilting was also by Three Sisters Fabrics.


IMG_5237


I saw a picture of a Chevron quilt in a quilting magazine and decided to make my own version. This is a small wall quilt. I used a lot of my mother’s fabrics in this project. Hand quilted by me.


IMG_5230


Next is Aunt Bea’s Parlor designed by Judy Reynolds and published by Black Cat Creations. These blocks were hand embroidered during the winter of 2012/13. I finished the piecing at the April retreat that spring. Hand quilted by me.


IMG_5234This is a crib quilt I pieced a couple of years ago and was long armed quilted by Sherryl Tobias, Nappanee, Ind last summer. I just started playing around with 2″ finished HST on my display wall and came up with this layout. I know I’ve shown this on the blog before.


IMG_5238


This is a little Prairie Women Journey 3 Flying Geese project I did in 2014. Also hand quilted by me.


IMG_5235This is the 9-patch/hourglass pattern  from the old Quick and Easy Scrap Quilts book published by Oxmoor House in 1995. I remember I remarked on the post I made last year that the piecing was simple but certainly wasn’t quick! I used Kaffe Fassett fabrics and she just glows! She is king sized and was quilted by the Three Sisters Fabric.

IMG_5231


In 2012 or 2013 I participated in a 3″ finished block exchange and received these blocks. Hand quilted by me. (Correction after original post, I quilted this on my domestic machine. Sorry)


IMG_5241

Two of the quilts were displayed in the hallway between the shops. Years ago I had purchased a jelly roll of batiks because I thought it was pretty. It laid around for several years until I decided to do something with it. I had never made a rail fence quilt and decided that would be the perfect way to display the batik fabrics. I did buy another jelly roll to use. The blocks in the checkerboard border are leftovers from the rail fence strips. I didn’t have a pattern, she just evolved. This quilt is queen sized and was quilted by Sherryl Tobias.


IMG_5240

This last quilt is my pride and joy. She took 8 years to complete because I didn’t work on her all the time, she was mainly a summer project. EPP is easy to pick up and put down.  She is completely hand pieced with 1″ hexagons and diamonds. Hand quilted by me .

I planned to hang her on the north wall in our living room, but she is too long.


I hope you enjoyed the quilt show.


The Jane Stickle Quilt Retreat

I’ve been home for several days from the quilt retreat. The retreat was formerly called the Dear Jane Retreat but at the November 2014 retreat, Brenda Manges Papadakis requested that we no longer use that name. We are a congenial group so of course we have acquiesced to her request and selected a new name, The Jane Stickle Quilt Retreat. Same group, same interests, same location, just a new name.

A week ago yesterday, I loaded up my car and headed off to Shipshewana to the Farmstead Inn anticipating 5 days of sewing, visiting, laughing, shopping and, of course, eating! I was NOT disappointed and this was the best retreat so far. They just keep getting better and better! Ninety-four quilters had plans and reservations to attend, but there is always illness and other factors that happen so we ended up with ninety in attendance.

IMG_5245There were several ladies working on the La Passacaglia quilt from the Millefiora Quilt book by Willyne Hammerstein.

This first star is English Paper pieced.


IMG_5246This star is pieced using inklingo. I’ve never tried inklingo but maybe I’ll give it a go sometime. It would certainly be faster.


IMG_5247I only saw one person actually working on Lucy Boston’s Patchwork of the Crosses by Linda Franz.

There were several other who had brought their blocks along to show others.

I’m going to EPP this quilt someday. I’ve been collecting border fabrics so I can make fussy cut blocks.


IMG_5248
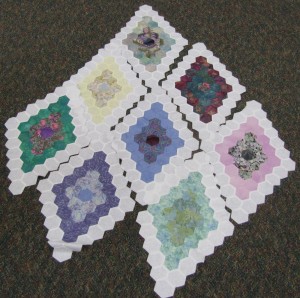
This was a hand sewn Grandmothers Flower Garden variation. I think she said she started it 20 years ago and is determined to complete it this year. She was removing part of the  white blocks so it wouldn’t be double white.

She just laid out the blocks for me to take a quick picture.


There were many other projects going on including several people working on their Jane Stickle quilt blocks but I don’t have any pictures of those projects.

IMG_5249Here are the projects I worked on. First I pieced a little quilt from the Prairie Women Journey 3 class I took a year ago. It measure 25″ by 30″.

I always do prep work at home and had already sewn the HST’s and cut the other pieced needed.


IMG_5250During the Shipshewana Quilt Festival they hold a Shop Hop. The shops involved request the participants piece and donate a designated quilt block. These blocks are sewn together into charity quilts and donated to various agencies in the LaGrange County area.

Last year’s shop hop block was a simple HST using a 5″ block cut in half. They were overwhelmed with blocks and are still working on getting them sewn into quilts. I was asked if I would be willing to make a crib quilt. I said yes and came up with this lay-out. The quilting is simple stitch in the ditch. I used leftover batting strips sewn together and put a medium blue flannel on the back. Looks cute and has been dropped off at the quilt shop.

IMG_5256
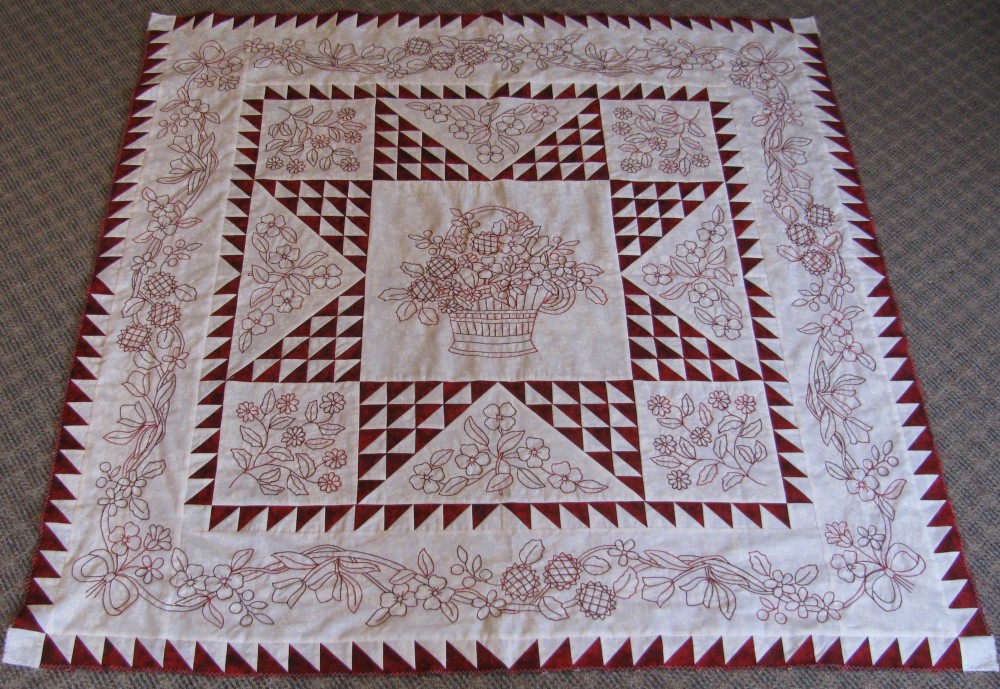
It didn’t take long to finish the UFO I had sewn into rows in March. I was so excited to have her finished and placed her on the floor in the hallway to be admired. (We do a lot of oohing and aahing during the retreat.) Someone asked me if I meant to place the block like that? Uh oh, which block? The block in the top left corner is turned incorrectly. I quickly responded that was my “humility” block. For now she is staying like she is. She won’t be taken to the long arm quilter until fall and I’ll probably decide to correct the positioning, but maybe I won’t. Perfection is sometimes overrated. How often do we see an antique quilt with a block turned the wrong way? This quilt will end up with one of the grandchildren someday and they can just laugh about granny’s mistake.

IMG_5259Last summer at the AQS show in Grand Rapids, Michigan, I bought a kit called Snowman Love from the Red Button Quilt Co. booth. I pieced the little quilt at the guild retreat in February and saved the hand sewing for the April retreat.

The embroidered design in the border was supposed to be a free hand curvy line with little curly curls. I’m not good at free hand so pulled a small quilt stencil from the stash and marked it.These are Amish snowmen. I’m not going to embroider faces on them. The hand quilting will take place sometime this summer.


IMG_5253


Of course I pieced some little 9-patches,


IMG_5260


And a lot of strips to be cut into sections for more 9-patch blocks at home.


I’m going to give you a link to  Rosemary Youngs blog. Click on the smilebox to see all the quilts shown at show & tell. This is beyond my computer skills but Rosemary does a fantastic job.

The days away at the retreat were a wonderful end to my winter. Now it is back to work.

I have 1 more row of the center part for the Jane Stickle quilt to be pieced before the first of May. The grass grew while I was gone and now the yards need to be mown. The rhubarb is ready to be cut and, surprise!, the asparagus is ready to eat too!

IMG_5225Just a couple more pictures. As I was loading the car to leave for the retreat, the Farmer opened the gates and let the cows down into the bottom pasture. They were so happy (me too!) and I snapped some quick photos.

IMG_5227

IMG_5228

Red Radiance

IMG_5218Even though my Jane quilt is a high priority, I haven’t forgotten about Red Radiance. The embroidery is finished and the piecing is completed. I need to get her marked then into the quilting frame she goes.

I have several other hand projects I’m considering. I show you what I’m up to when I decide which one to work on.

The Jane Stickle Quilt, Row L

IMG_5222Row L is now history. Do you see something different about some of these blocks? Well, if Jane would have had access to Karen Kay Buckley’s perfect circles, there would be some circles in this quilt, not all diamonds and triangles.

I’m just not able to applique those tiny little 1/4″ triangles so I decided to improvise and used circles. It just makes this project my own.

And of course, the row attached to the body.

IMG_5223Just one more row and I’ll have the center completed!

Laying Hens

Did I ever tell you guys I have laying hens? I love having my own eggs to use but the old chickens aren’t laying very well anymore. I thought I would get chicks and raise them but they wouldn’t lay eggs until maybe the end of August.

In this week’s  Farmer’s Exchange, there was an ad for pullets ready to start laying. That would save a lot of time, so the Farmer and I drove to the farm and checked them out. Or actually, I checked them out; the chickens are my project. They were clean and healthy so I bought 15 of them.

IMG_5209We brought them home and settled them into their new pen. They’ve adapted very well to the change of feed and the new surroundings. Their feathers are a little ruffled from the ride home in a wire cage in the back of the truck.

These are Isa Brown layers. They are a hybrid cross between Rhode Island Reds and White Leghorn and will lay brown eggs when fully mature.

In the back of the pen you can see part of the nesting box. They will hop up to the foot rail then step into the straw lined nest and lay their eggs. A chicken will lay 1 egg a day but not necessarily everyday.

Quilt Gardens Along the Heritage Trail

I left yesterday morning for a quilt retreat, my last retreat of the season. I’ve prepared some posts for you to read while I’m gone.

Several years ago, someone from the local tourism board got the bright idea to have “Quilt Gardens” along the Heritage Trail. This is a driving tour that is free of charge. You just drive and look at the flower gardens planted in quilt designs. Click on Quilt Gardens for the website and a free map of the tour. Click here for information on each of the quilt blocks from 2014.

IMG_4589I admit I’ve never visited most of the gardens. I’m just too local but last fall I did take some pictures of the gardens that I drive by in my comings and goings. All of the gardens have a descriptive marker that tells you the location and pattern of the garden. The first garden is in Wakarusa.


IMG_4593


Quilt Garden in Wakarusa, Indiana.


IMG_4592


They also have quilt signs hanging on buildings. A local Wakarusa woman designed this quilt.


IMG_4616


The next stop is at the Das Dutchman Essenhaus in Middlebury. I took these pictures on my way to Shipshewana. Sorry about the  blurriness. I remember it was a very bright and sunny day.


IMG_4617I had to walk way into the yard to get a good picture. The best view would be from the motel rooms.

IMG_4622


The next stop is at the Dutch Country Market on the Middlebury-Shipshewana Road. It has an official road number but I don’t know what it is. We’ve always called that road the Middlebury-Shipshewana Road.


IMG_4621


And the quilt garden.

IMG_4627


The last stop is at the Farmstead Inn along State Road 5 in Shipshe.


IMG_4626


And the garden.


IMG_4634

The last picture I’ll share is a barn quilt photo I took on the Goshen-Middlebury Road. I would love to have a barn quilt on one of our barns, but I just can’t get the Farmer interested in this idea.

I hope you enjoyed your partial tour of the Quilt Gardens Along the Heritage Trail.

I’ve planned all winter to post these pictures but didn’t get to it until now. Sorry.


The Jane Stickle Quilt, Row K

IMG_5203


The row K blocks in my Dear Jane quilt are pieced!! The one star in the bottom row is supposed to have the points cut off. And yes, I know, those diamonds in the first block of the 2nd row are kind of wonky. It is done and I’m not going to change it.  There is also a block in the 2nd row that looks overly big but it isn’t. It is squared to 5 inches just like all the others.

This row is attached to the body.

IMG_5204

Just 2 more rows to go!

Coconut Cream Pie!

When I started blogging, I thought I would talk about cooking or baking more often but that hasn’t happened. I guess I’m just a boring cook, but sometimes I do make something new.

Part of my morning routine is to check e-mail, then I read blogs. One of the first blogs I always check is Mennonite Girls Can Cook. They have some good recipes there but I don’t try new recipes like I used to years ago. However in March they gave the recipe for Coconut Pie Crust. The farmer loves coconut so I downloaded the recipe to make for our dessert on Easter.

It was delicious! I made the crust exactly like the recipe said.

I used their Coconut Cream Pie Filling recipe for the filling. (There is a link in the pie crust recipe for the filling too.) The pudding calls for a can of coconut “milk” (it isn’t milk, call it coconut water or coconut juice, I don’t care what you call it but it is not MILK) which I actually had on hand. I couldn’t taste any coconut flavor in the pudding so next time I won’t use the coconut water and will just use all 100% real milk.

I did take a picture of the pie after it was cooled. You are supposed to put parchment paper on top while it cools, which I did, but when I peeled off the paper, it messed up the top and didn’t look that nice. Look at the picture with the recipe, it is picture perfect!